Using NoteCard Tutorial Movie
Student Help NoteCard Topics
Step 1: NoteCards Login (Back to Top ... )
By clicking the NoteCards button on your Web browser's toolbar,
you will be taken to the NoteCards Login.
Enter your username and password to login. Don't forget that your username ends is _zipcode (for example, carriej_66045). If you cannot
remember your password, contact your instructor.
Click the Login button.
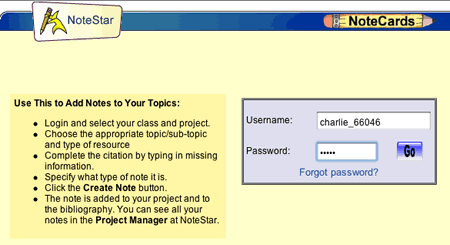
Click the Continue link, if you have logged in correctly. If another student has logged into NoteCards on your computer, please click the Re-Login button to logout of the other student's account and into your account. Remember, if you deliberately log into NoteCards as someone other than
yourself, you may get in serious trouble with your instructor.

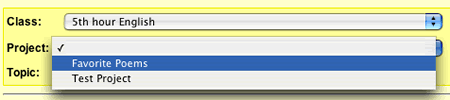
Step 2: Select a Project (Back to Top ... )
In order to add notes to your account using the NoteCards tool, you must first select a Class from the drop-down menu.
Then select a Project from the next drop-down menu. Finally, select the Topic or sub-topic from the last drop-down menu.
Step 3a: Adding Topics (Back to Top ... )
Once you have clicked your NoteCards button and have choosen a Class and Project, you will see a link that says Click Here to Go to NoteStar to Add New Topics and Sub-topics.
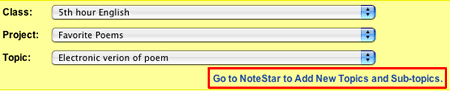
This gives you a chance to either set up your topics and sub-topics if you haven't done so yet or enter a new topic or sub-topic that you thought of while looking for notes. Please visit the Project Manager section of this tutorial if you do not know how to add new topics and sub-topics.
Step 3b: Taking Notes
(Back to Top ... )
Next click on the link to the appropriate type of source from which you are gathering notes. You may choose from Internet, Book, Magazine, Journal, or Newspaper.
Once you have selected the appropriate type of source, you may start gathering information. Enter any of the missing information on your NoteCard, and then either copy and paste words into your NoteCard or type your own words in the note text field. Be sure to specify whether the note is in your own words or quoted, by clicking the radio button next to Your Own Words or Quote. The circle will fill in with a dot next to the one you have selected.
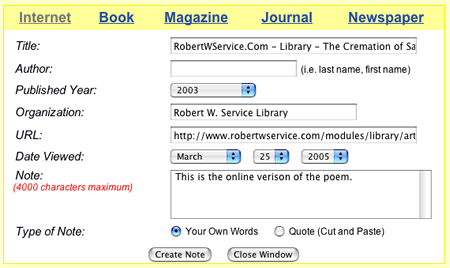
When you are finished entering your note, click the Create Note button. If you are finished taking notes on this source, click the Exit link. If you have more notes to enter on the same source click the Create New Note button.
|
|


