Student Help:
Manage Notes and Topics
Viewing Notes and Bibliography Tutorial Movie
Reorder Notes Tutorial Movie
Topics
Overview of the Project Manager (Back to Top ... )
You may access the Project Manager from one of two places (you must login to NoteStar first):
- On the navigation bar, click the Projects link that is on all of the NoteStar pages on the upper right-hand side of the page.
- On the Student Home page, click the Project Manager link.
The Project Manager will list all assigned projects. Beside each project, you will see the project id number, the project name, teacher, class name, and date created. Click on the project name in order to work on that assignment.

On the Show Project Detail page, you will be presented with a series of Operations on the left-hand side. These options
include:
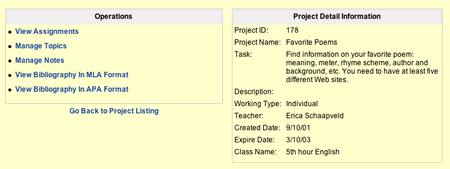
Below you will find the directions to each of these options.
Viewing an Assignment
(Back to Top ... )
To view your assignment, click the View Assignments link under the Operations on the Show Project Detail page. This View Assignments page will show you the project name, assignment, and whether you will be working individually on the project or with a group. If you are working in a group, your group members will be listed.
Creating Topics and Sub-topics (Back to Top ... )
Go back to your Show Project Detail page and click on the Manage Topics link in order to start working on creating and managing your topics and sub-topics. If you have not created any topics yet, you will need to click the Create New Topic link.

Note: You must have at least one topic before you may take notes with the NoteCard tool.
To create a new topic, follow these steps:
- On the right-hand side of the Create Topic page, you can enter a Topic Title along with a Description.
- Once you have entered the appropriate information click the Create Topic button.
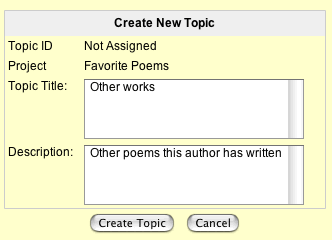
- The topic will automatically be added to a topic and sub-topic list on the left-hand side of the page.
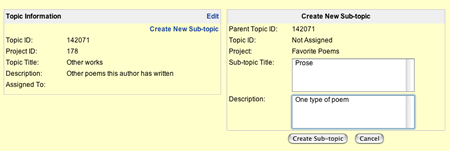
- The new topic you just added also shows on the right-hand side and gives you an option to either Edit the topic you just created or Create New Sub-topic.
To create a new sub-topic, follow these steps:
- To create a sub-topic, click the Create New Sub-topic link.
- Enter a Sub-topic Title and Description.
- Click the Create Sub-Topic button.
- This sub-topic will be added to your list of topics and sub-topics.
Continue adding topics and sub-topics by repeating these steps.
Managing Topics and Sub-topics (Back to Top ... )
To edit a topic or sub-topic, follow these steps:
- Go to the Project Manager and click on the Project Name you need to work on.
- Click the Manage Topics link.
- Click on the topic or subtopic that you need to edit. This topic or sub-topic will then show in its own box on the right-hand side of the page.
- Click the Edit button on the top of that box.
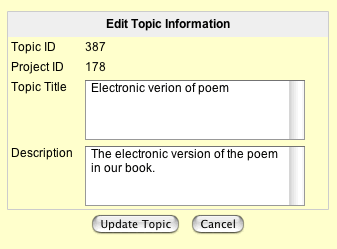
- Make any changes you want and then click the Update Topic button.
To reorder a topic or sub-topic, follow these steps:
- Go to the Project Manager and click on the Project Name you need to work on.
- Click the Manage Topics link.
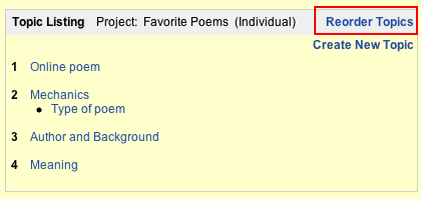
- Click the Reorder Topics link.
- Use the drop-down menus beside each topic to select the number of the order you would like these topics to appear.
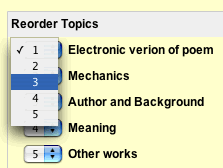
- Click the Reorder button.
To delete a topic or sub-topic, follow these steps:
- Go to the Project Manager and click on the Project Name you need to work on.
- Click the Manage Topics link.
- Click on the topic or subtopic that you need to delete. This topic or sub-topic will then show in its own box on the right-hand side of the page.
- Click the Delete button, which is right next to the Edit button on the top of that box.
- A warning window will appear to ask if you are sure you wish to delete the topic or sub-topic. Click OK if you are sure. Note: If you choose to delete a topic, all sub-topics and notes under that topic (and its sub-topics) will be permanently deleted. If you intentionally delete your fellow group member's work, you will likely face disciplinary action.
Managing Notes
To edit or move existing notes, follow these steps: (Back to Top ... )
- Go to the Project Manager and click on the Project Name you need to work on.
- Click the Manage Notes link.

- To update a note, click the Edit link next to the note that you would like to edit.
- You may edit the topic, title, author, published year, organization, url, date viewed, note, and whether the note is in your own words or is a quote.
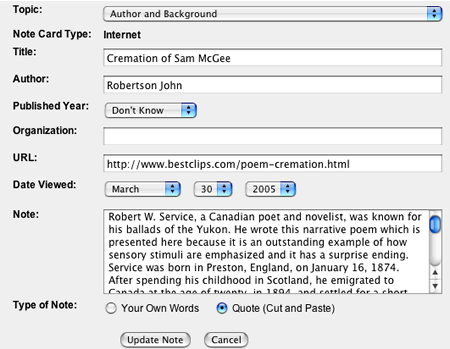
- To move one note from a given topic or sub-topic to a different topic or sub-topic, select the topic or sub-topic in the drop-down menu that you would like it to be moved to.
- Once you are finished editting, click the Update button.
To reorder notes, follow these steps: (Back to Top ... )
- Go to the Project Manager and click on the Project Name you need to work on.
- Click the Manage Notes link.
- Click the Reorder link at the top, right-hand corner of the Manage Notes page next to the topic or sub-topic whose notes you would like to rearrange.
- The old order will be listed next to each note. You may choose a new order by selecting numbers from the drop-down menus next to each note.
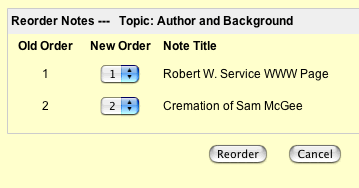
- Once you are finished reordering your notes, click the Reorder button.
To delete notes, follow these steps: (Back to Top ... )
- Go to the Project Manager and click on the Project Name you need to work on.
- Click the Manage Notes link.
- To delete a note, click the Delete link next to the note that you would like to erase. Note: If you choose to delete a note, it will be permanently deleted. If you intentionally delete your fellow group member's work, you will likely face disciplinary action.
View Bibliography
(Back to Top ... )
The bottom two links on the Project Manager allows you to view your bibliography from the notes you have collected so far. You may view the MLA or the APA style bibliogrpahy by clicking either
the View Bibliography in MLA Format link or the View Bibliography in APA Format link.

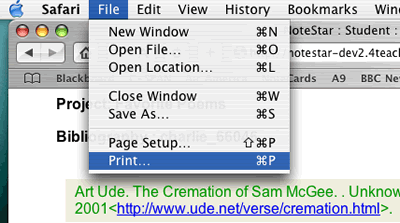
While viewing your bibliography, click the Printer-Friendly link in order to go to a black and white version of your bibliography. This version will open in a new window and you can go to the File menu of your browser and select Print.
|