NoteStar : Help : Class Manager
4 Teachers Tools
  Enhancing Research Skills for Student Achievement
   
 
Teacher Help: Class Manager
Help Home  |  Overview  |  Teacher  |  Student  |  NoteCard
 

Class Manager Tutorial Movie

Class Manager Help Topics


Class Manager Overview    (Back to Top ... )
Whenever teachers set up their NoteStar account, they have the option to enter their class rosters at that time. If you choose not to add your roster while you were registering and you are now ready to or you have a new class and would like to create a roster for it, simply go to the Teacher Home and click the Class Manager link.
 
The Class Manager allows users to:


New Class Step 1: Entering a Class Name.    (Back to Top ... )

Follow these steps to create a new class:

  • In the Class Manager, click the Create a New Class link as shown in the image below.


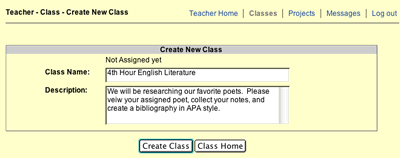
  • In the space provided, enter the name and description of the class you wish to create.

This is an image of the Create New Class page.  Next to the Class Name field it says "4th Hour English Literature" and next to the Description field it says "We will be researching our favorite poets. Please view your assigned poet, collect your notes, and create a bibliography in APA style.". There is a Create Class button and Class Home button at the bottom of this page.
 

  • Click the Create Class button.
     
  • If the information is correct, click the Go Back to Class Listing link.


New Class Step 2: Adding Students to the Class Roster.    (Back to Top ... )

Follow these steps to add students to your roster:
  • On the Class Listing page, click the Roster link next to the class you just created as shown in the image below.

This is an image of the Class I Created list which shows the class id, class name, gives and Edit link to update the class information, a Roster link to enroll students in the class, and a Delete link to erase the whole class.  The date the class was created is also listed.  On this image the roster link is selected.
 

  • Click the Add New Students to this Class link to add students to your class.

This image shows the Show Roster page. It has a message on it that says "There is no student enrolled in your class yet."  In the upper right hand corner of this page there is an Add Students to this Class link and it is selected.
 

  This is an image of the Create New Student fields.  Student User Name field has "sandyj" typed in it. The password field has a Password typed in it and dots showing. The First Name field has Sandy typed in it, and the Last Name field has Jones typed in it.  There is a Create Student button and a Class Home button at the bottom of this page and the Create Student button is selected.

This image shows where you can Add Existing Students to the Class. It says "Add student by typing student's username.  The username "blcheng" is typed in the field and there is an Add Student button right next to the field.  The button is selected.
 

This image shows the Add Enrolled or Registered Student field and a list of students.  The Student id is listed, the name, and then an Add link.  The Add link is selected.


Update an Existing Class Roster    (Back to Top ... )

Follow these steps to update your roster:

  • On the Class Manager page, you will see a list of all your classes.
     
  • Click the Roster link next to an existing class. This will take you to the Show Roster page.

  This is an image of the Class I Created list which shows the class id, class name, gives and Edit link to update the class information, a Roster link to enroll students in the class, and a Delete link to erase the whole class.  The date the class was created is also listed.  On this image the roster link is selected.

  • Click the Edit this Roster link.
     
  • Follow the instructions given above for Step 2 to add students.
     
  • To change a student's personal information, click the Update link next to that student's name.

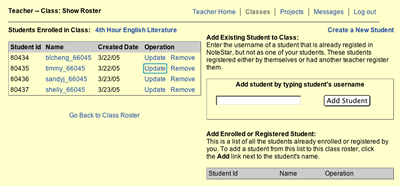
This image shows the Show Class Roster page where all the students in the class are listed on the left-hand side of the page.  Next to each student is an Update link and a Remove link. On the right-hand side of the page is the area to add more students.
 

  • To delete a student, click the Remove link next to that student's name.
     

Printing Class Roster    (Back to Top ... )
  • To print your roster go to the Class Manager page and click Roster next to the class whose roster you would like to print.
     
  • Once you are on the Show Roster page, click the Printer-Friendly Roster link.
     
  • You will then see a black and white verison of your roster.
     
  • To print this version, go to the File menu on your browser and select Print as shown in the image below.

    This is an image of the black and white printable roster.  The File menu on the browser is extended and Print is selected.


RubiStar | QuizStar | TrackStar | Think Tank | Web Worksheet Wizard | More Tools Terms of Use | Contact Us | ALTEC
Copyright. © 2000 - 2009, ALTEC at the University of Kansas.