- Create research projects and set criteria for the students to follow.
- Assign students to these projects either individually or in groups.
- Track students progress as they perform their research.
- View existing classes and their projects.
- Choose to Create a New Project.
- If projects already exist, teachers may choose from the
Edit,
Delete,
Assignment, and
Progress options for each class.
Creating a New Project
(Back to Top ... )
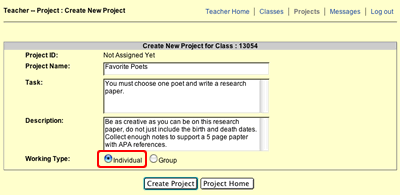
- In the Project Name field, enter the title of your project. (i.e. Famous Scientists)
- In the Task and Description field, you will enter whatever instructions you wish to
give the students for this assignment.
- Lastly, you will determine if your students will be working collaboratively in groups or individually.
Click the radio button (small circular button) to select Individual or Group. In the image below, the Individual button is selected.

- Click the Create Project button.
You must now assign students to the project. On the Project Manager page, click the Assignment button next to the class working on this project. On this page, you may assign topics to your students. The reason for assigning a topic is simple.
You may create a broad project theme such as Famous Scientists. Then you may assign topics to each student
to refine their project (i.e. Einstein, Newton, etc).
Assigning Topics to Individuals
If this project is for individual students, follow these directions:
- Click the Add New Assignments link to assign topics to students.

- You will see a list of all the students' name. In the topic field next to each student, simply type in a topic. If you do not wish to do so, just leave the field empty or with Not Assigned Yet showing.

- When you are finished, click the Update Assignment button.
Assigning Topics to Groups
If this project is assigned to groups, follow these directions:
- Click the Add New Student Group Assignments link to assign topics to groups.
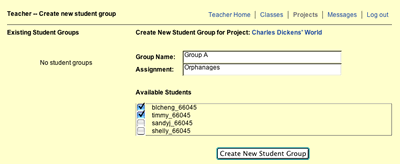
- You will now be able to create student groups and assign them a topic.
- Click the Create New Student Groups link.
- Enter a Group Name and Assignment.
- Click the boxes to check the names of the students that will be in this group.
- Click the Create New Student Group button.

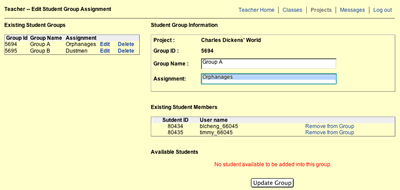
- Repeat these steps until all students are assigned a group and topic, then click the Return to Project Project Assignment View link.
- On this page you will be able to view groups, edit members, change topics, and delete groups.
- Click the Go Back to Project Home link when you are finished.
Project Manager Menu
(Back to Top ... )
This menu provides you with many options to manage your project.
These options are:

Viewing a Project
(Back to Top ... )
To view a project will on the Project Manager page, simply click the project title assigned to the class.
You will then be taken to a new page which lists the project id, name, description, task, date created, expiration date, warned date, and whether the project is assigned to individual students or groups.
Expiration date is one year from the date created. We will send you an email warning one month before the scheduled expiration date to offer you a chance to either warn your students to gather their notes before deletion or give you a chance to extend your project for another year.
Editing and Deleting a Project
(Back to Top ... )
To edit your project name, task, or description, go to the Project Manager and click the Edit button next to the class project that you would like to update. The Edit Project page is virtually identical to the page used to create your project.
You are no longer given the option to select whether or not you wish to assign this project to individuals or groups.
To delete your project and all work done by your students, go to the Project Manager page and click the Delete button next to the class project that you would like to completely erase. Note: If you choose to delete a project, all of your students' work will be lost.
Managing Students, Groups, and Topics
(Back to Top ... )
For Individual Students
If you wish to change or delete topics assigned to individual students, go to the Project Manager and click the Assignment link next to the class project you would like to work on. This will take you to the Show Project Assignment page.
To assign or update a student's topic, click the Edit Assignments link. Once you are finished updating the topics click the Update Assignment button.

For Groups
If you wish to add or modify a group, go to the Project Manager and click the Assignment link next to the class project you would like to work on. This will take you to the Show Project Assignment Group page.
To change groups, click the Group Name. You will then see a list of all your existing groups. Click Edit or Delete next to a group if you wish to change anything. Note: if you delete a group the individual student's information will NOT be lost. Deleting a group simply removes all students from that group and puts the student's name back in the list that allowing you to create new groups.

You can also change or delete a group and its topic by using the Edit Members link or the Delete Group link on the Show Project Assignment Group page.
Viewing Students' Progress
(Back to Top ... )
For Individual Students
To view an individual student's progress, go to the Project Manager and click the Progress link next to the class project you are managing. This will take you to the Show Student Progress page. Click the Show Notes link next to the student whose notes you would like to view.
On the Show Student Notes page, you may view the sources that the notes came from. Simply click
the url of the Internet site from the information provided directly under the note. This will open up a new window and take you to that Web site.
You can also communicate with the student or print the notes. To send an email to that student, click the Send Message link. To print the notes, click the View Printable Notes link and then select Print from your browser File menu.

To view an individual student's works cited page, click the Bibliography MLA or Bibliography APA.

For Student Groups
To view a group's progress, go to the Project Manager and click the Progress link next to the group whose class project you are managing. This will take you to the Show Student Group Progress page. Click the Show Student Group Notes link next to the student whose notes you would like to view.
On the Show Student Group Notes page, you may view the online sources that the notes came from. Simply click the url of the Internet site from the information provided directly under the note. This will open up a new window and take you to that Web site. There will also be a student name next to each note. This signifies which student in the group took the note.
You can also communicate with the group or print the notes. To send an email to the group, click the Send Message link. To print the notes, click the View Printable Notes link and then select Print from your browser File menu.
To view a group's works cited page, click the Bibliography MLA or Bibliography APA.
Go Back